My Marie Antoinette inspired Floral Francaise is coming along. I've changed my approach just a bit as I've done more research and am now making it more historically accurate, which means straying a bit from the movie dresses, but I don't think to far. I've also decided to hand sew it. Well, I'll do the skirt and petticoat seams on the machine, but everything else will be by hand. What can I say? I've been sucked in to the hand sewing thing. I like working on it at night while watching Netflix. And I'm getting better too, which is good! :)
So here's my inspiration and how mine is coming:
 |
| This one's my favorite. I love that fabric! From here. |
I decided to make the front a center front closing instead of doing a stomacher. I found lots of period examples of this and I really liked the look. I also haven't seen many other people do it this way, so it would be a little different, which I also like. :) Here are some other dresses that I drew a lot of inspiration from, including something I'm doing with mine, angling the stripes on the front.
 |
| This is from Costume in Detail, it's a dress from 1742-52, but I loved the center front opening and the trimmings! |
I was surprised at how early this gown was, when it seems like most others at this time period all had robings, I thought they would be on later gowns, which was true of the others I found. And some with stripes!
 |
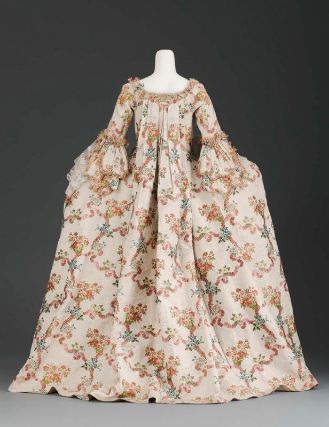
| From the Kyoto Fashion book, you can see there are no robings, and in another picture (that's sort of blurry since it's in the background) it looks to be a center front closure and the description says it buttons closed, it's from 1770-5. |
 |
| Another center front opening, again from 1770-5, and the stripes (which are hard to see since I cut the rest of the dress out of the picture) of the dress are slightly angled on the front and the trim follows the pattern! |
So! Here's my progress so far. I draped the back and sewed the pleats down as well as tacking them in a line and also tacking down the back sides to make it more fitted. These two are from before I sewed the pleats down.
 |
| Look how the pattern lines up down the pleats! :) |
 |
| From the side. |
I also draped the bodice today, since I'd figured out what I wanted, and I'm really happy with the fit, though it did take some time. I cut my fabric out, the floral fabric on the diagonal, and will hopefully start sewing that tonight or tomorrow night!
 |
| The front, I did make some alterations after this, but it looks pretty much the same, which is to say fitted! :P |
 |
| And from the side. I'm liking how the back hangs. This is after I've sewn the pleats. |
So after I sew the front bodice on to the back, I'll cut the front panels and attach them, then make the petticoat. Man am I glad I bought more fabric! I would not have had enough with my original 5! Then it's sleeves and trimming! And hemming, which I always find a pain, especially on large hems like this!!
I've also been working on the hat for this which will be a little straw one I think. Though I may cover it with ivory silk, like the one in the movie's garden scene above. I partially took apart a straw dolls hat, am flattening it, and I will sew the little crown back on.
So it's coming along! I have to finish it before April 9th, which is another 18th century ball. And of course I'll be wearing it to Costume Con. :)
I've also got lots of other plans for other things, but I'll save that for another post... ;)


